New Year Special : Self-Learning Courses: Get any course for just $49!  - SCHEDULE CALL

- DevOps Blogs -

Famous and Easy ways To Know About Jenkins Build Job Setup


Introduction

In the last blog we discussed Jenkins configuration settings which will be helpful in managing our job with demo. Now, we will proceed to check how to create Jenkins build jobs. Jenkins build job cannot be triggered manually. Jenkins build job should be triggered automatically for any push or whatever hooks created. We will discuss hooks also in this blog. Jenkins build jobs pipeline will be executed on the basis of these (web)hooks. 

So, Let’s start !!
Create Multi-Branch Pipeline Job

  • Click New Item, Provide Job Name → Select “Multibranch Pipeline” → Press OK
  • In Job configuration page enter description, which is optional
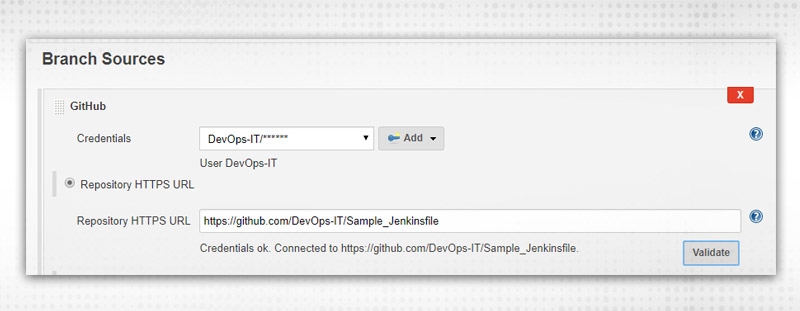
  • Provide Branch Source

Multibranch Pipeline

Enter Credentials and Repository URL. Press Validate, to verify if the connection is OK.
  • Click Save
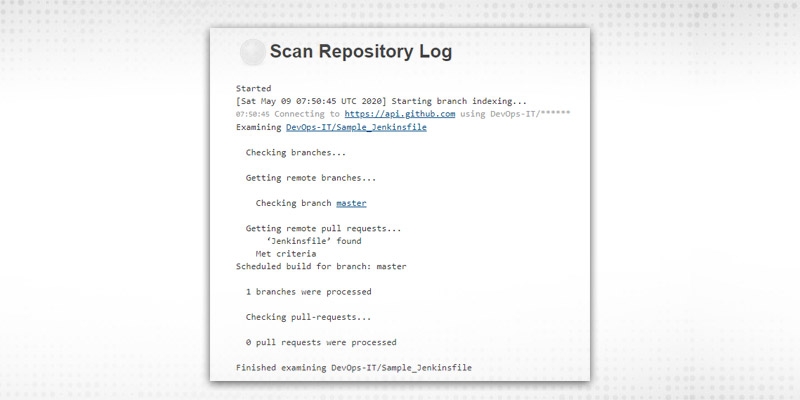
  • It will scan the repository and create job for all branches found in that repository:Multibranch Pipeline2

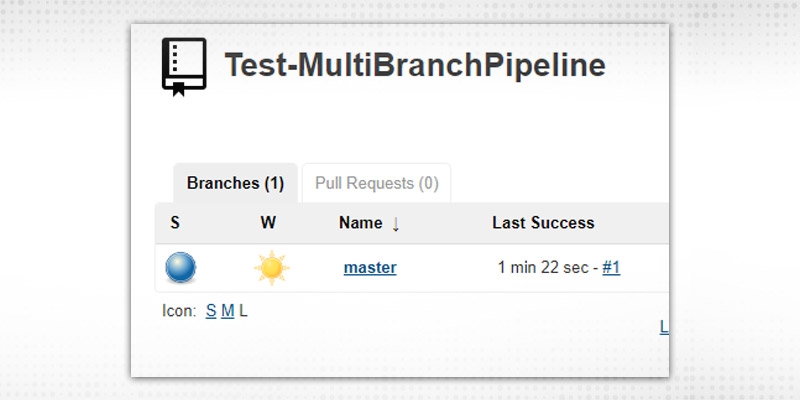
As you can see, only 1 branch is processed, which is master. So, it will create a job with the “branch name” and execute it.
Multibranch Pipeline3

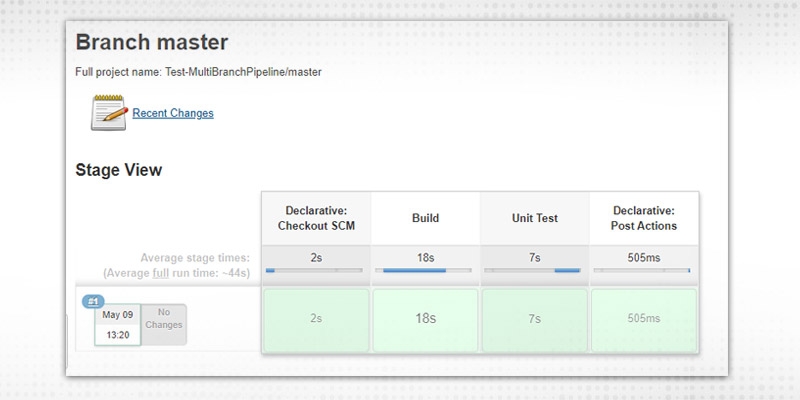
  • It executed the Jenkinsfile on the code found in the “master” branch. Click on a master job and see console output or check the stage:

Multibranch Pipeline 4

  • Now, we will create a new branch in GIT and scan the job again to check if that will also come as a separate job or not.

git checkout -b feature/DevOps-1

git push origin feature/DevOps-1
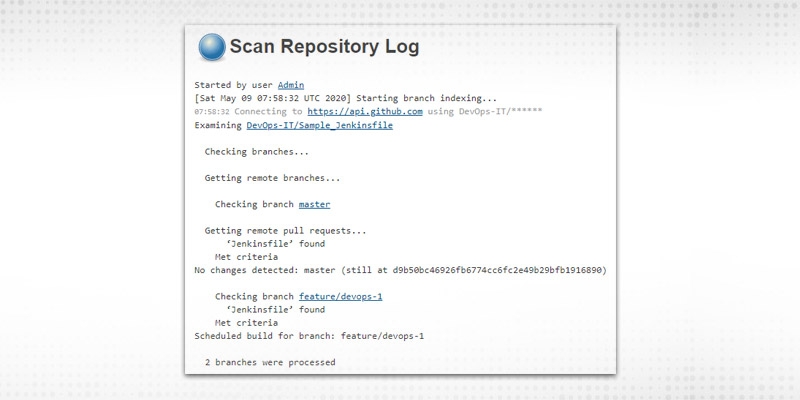
  • New branch is pushed to the Github repository. Click “Scan Repository Now” from Jenkins and check “Scan Repository Log”:

Create Multi-branch pipeline job2

It included a feature branch also now. Check from Job perspective:
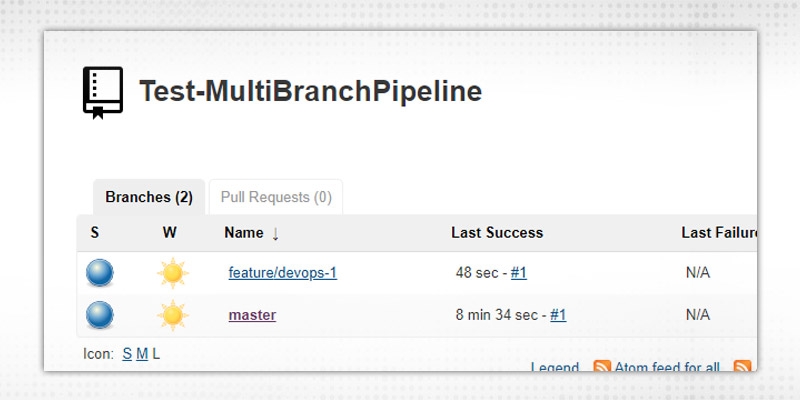
Create Multi-branch pipeline job3

  • Now, Jenkinsfile inside the feature branch will be executed based on code present in each branch. We will create Webhooks now so that Jenkins build job automatically for any push irrespective of clicking “Scan Repository” feature.

Creatine WebHooks

  • Webhooks are required for communication between Jenkins build job and Github repository. First check for the hook URL of Jenkins machine. 
  • Go to Manage Jenkins → Configure System. Search for Github configuration section and click on “Advanced” Creatine WebHooks
  • Select “Specify another hook URL for GitHub configuration” and copy the Github-webhook URL present in the text-box and unselect it. Creatine WebHooks2
  • Click Save and you will be back to Jenkins dashboard.
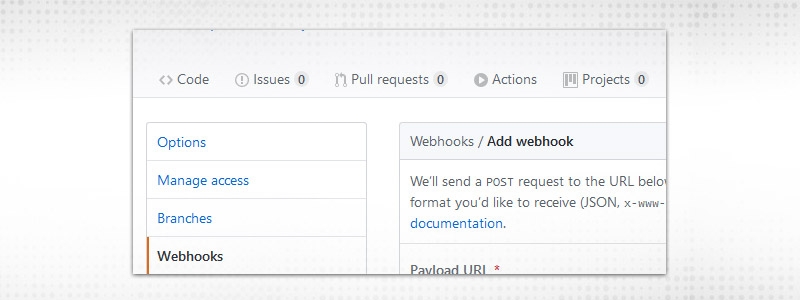
  • Open your Github repository from the browser. Click on Settings. Creatine WebHooks4
  • Click on Webhooks Section and “Add Webhook” button

 Creatine WebHooks5

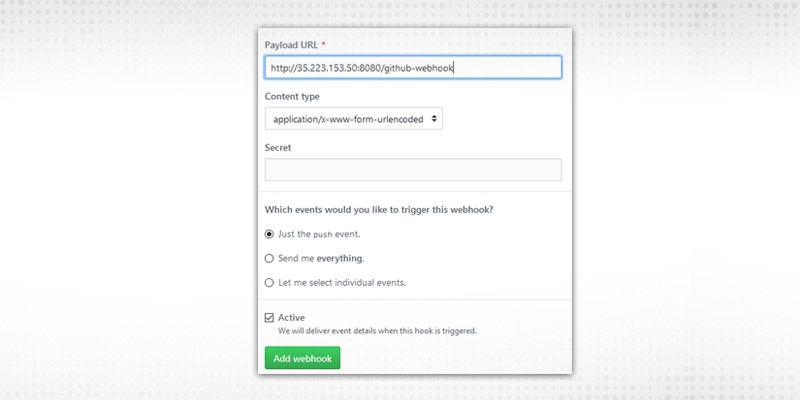
  • Paste the hook URL in “Payload URL”. Select “Just the push event” and click on “Add Webhook

Webhook

Webhook is created.

  • Now, you can try to push any change to your branch. Now, you will see that Jenkins's job will be triggered automatically. Note here that As per the process, Jenkins build job cannot be triggered manually.

Now, the build is configured to trigger automatically.

Pre-build stages in Jenkins Build Job Pipeline

- As such, there is no pre-block in Jenkins build job pipeline but some of the things we can perform as preconfiguration of the start of pipeline. Some of the basic sections be

  • Cleaning of workspace before build starts
  • Define parameters to be required during build
  • Define some variables to be used in different stages
  • Read some configuration values

etc.

There are multiple scenarios but most common we will discuss here Jenkins build job parameters, known as “Parameterized Pipelines” 

  • Create a parameters block before stages and define the type of parameters, you want to create with proper arguments, like name, value, description 
  • Different types of Jenkins build job parameters are:

Pre-build stages in Jenkins build job pipeline

e.g.

parameters {

  booleanParam defaultValue: false, description: '', name: 'BOOL'
  choice choices: ['dev', 'stage'], description: '', name: 'CHOICE'
  credentials credential Type: 'com.cloudbees.plugins.credentials.impl.Username->Password->CredentialsImpl', defaultValue: 'a096c812-1543-4328-b3e0-33cc5117045d', description: '', name: 'CRED', required: false

  file description: '', name: ''
  password default Value: '', description: '', name: 'PASSWD'
  run description: '', filter: 'ALL', name: 'RUN', projectName: ''
  string defaultValue: '', description: '', name: 'ENV', trim: false
  text defaultValue: '', description: '', name: 'MULSTR'

}
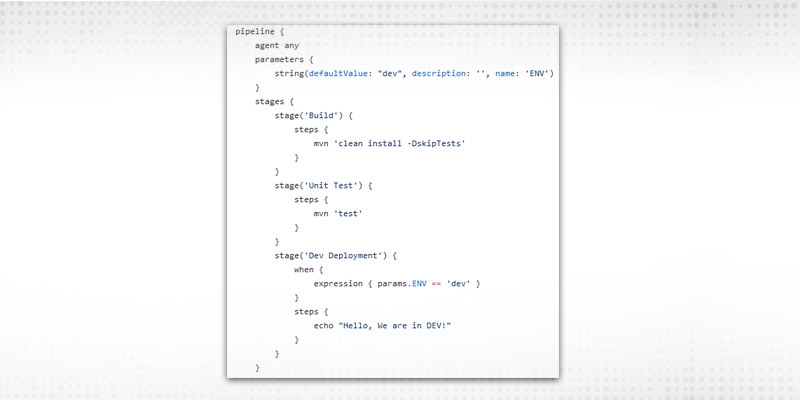
  • Suppose, our build depends on the environment for which it is being built, we will create a String parameter with name “ENV” and use its value in our Jenkinsfile.
  • Sample Jenkinsfile is as follows:

Pre-build stages in Jenkins build job pipeline

  • We create a string parameter with the name “ENV” and use it in one of the stages if the ENV value is ‘dev’. Now, let’s do the build, and then we can observe.
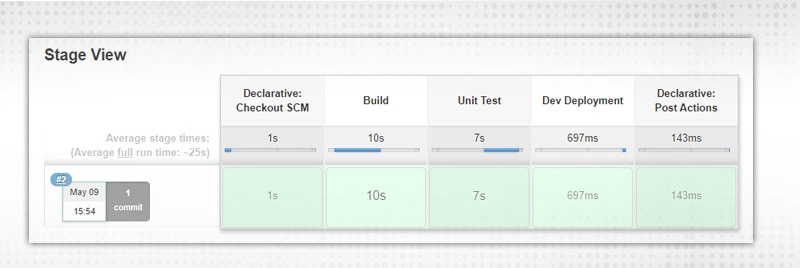
  • When Jenkinsfile changes got pushed, build started on master (because of webhook) and observe the stages as default is ‘dev’, so our 4th stage got executed:

Pre-build stages in Jenkins build job pipeline6

And “Build Now” changed to “Build with Parameters” as now our build require parameters to run:
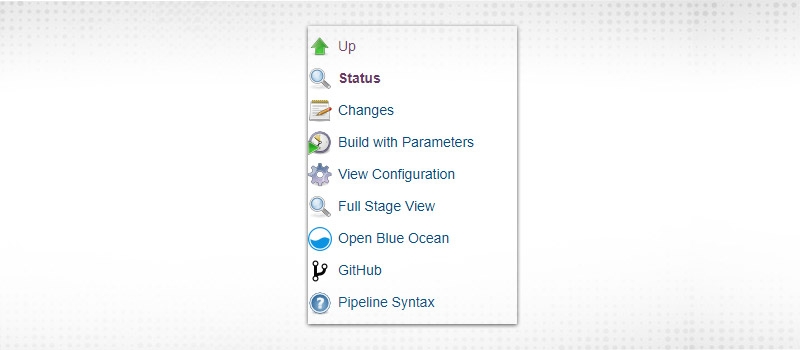
Build Now

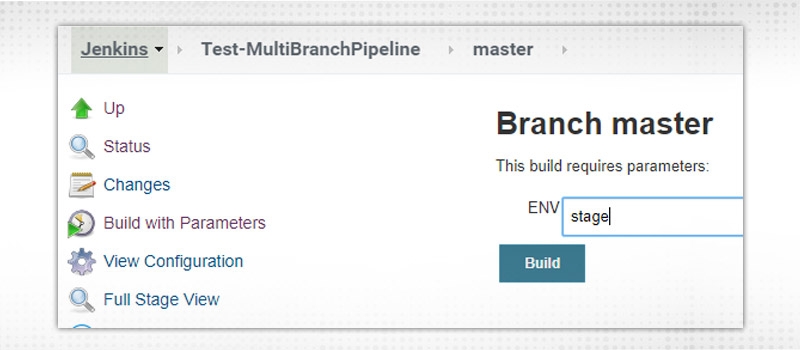
  • Run build manually and pass the environment as “Stage

We will check that “Dev deployment” stage will not be executed, see console output:

pipeline stage

Stage skipped due to “when” condition

  • Some of the blocks to define before our stages to execute sequentially
    • environment - Specify one or more environment variables to make available in this Pipeline or stage.
    • options - Specify one or more options, including appropriate job properties
    • input - Specify an input step to run at the beginning of a stage.
    • tools - Specify one or more tools configured in Jenkins to automatically install and add to the path.

Different blocks specified as per project requirements and complexity. Jenkins build jobs will be using these options to create complex pipelines and to ease our manual efforts.

Post-build Stage

There are various actions, which need to be performed after completion of all stages or jobs. Some of the prominent conditions to execute post actions are:

  1. always - Always run, regardless of build status
  2. unstable - Run if the build status is "Unstable"
  3. notBuilt - Run if the build status is "Not Built"
  4. Cleanup - Always run after all other conditions, regardless of build status
  5. regression - Run if the status of the current build is worse than the status of the previous build
  6. aborted - Run when the build status is "Aborted"
  7. success - Run if the build status is "Success" or hasn't been set yet
  8. failure - Run if the build status is "Failure"
  9. unsuccessful - Run if the current builds status is "Aborted", "Failure" or "Unstable"
  10. fixed - Run if the previous build was not successful and the current builds status is  "Success"
  11. changed - Run if the current builds status is different than the previous builds status

Normally, the post section should be placed at the end of the pipeline and it contains steps like in the stage block but depends on the condition defined above. Syntax is somewhat like:

post {
        always {
            cleanWs()
        }
    }

Above Jenkins build job example will always clean up the workspace irrespective of the build result. Generally, notifications and cleanup activities done in post actions. By notification, we can set up the Slack, skype, EMAIL, or Github notification. As per the blog’s perspective, we will discuss setting up EMAIL notifications.
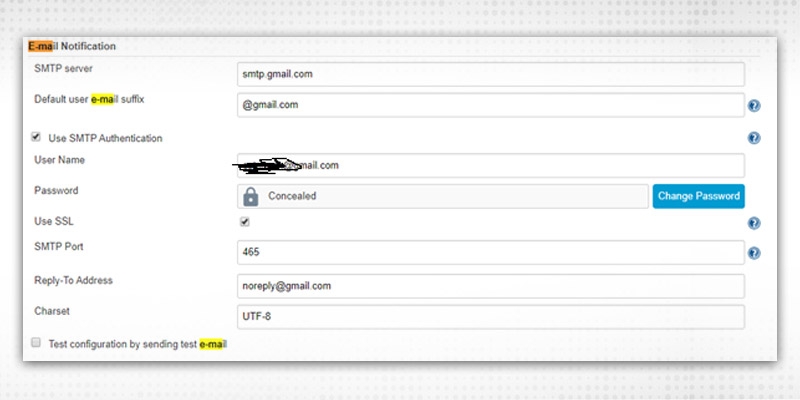
  • Configure EMAIL notification by going to Manage Jenkins → Configure System

And then specify email notification in Jenkinsfile:
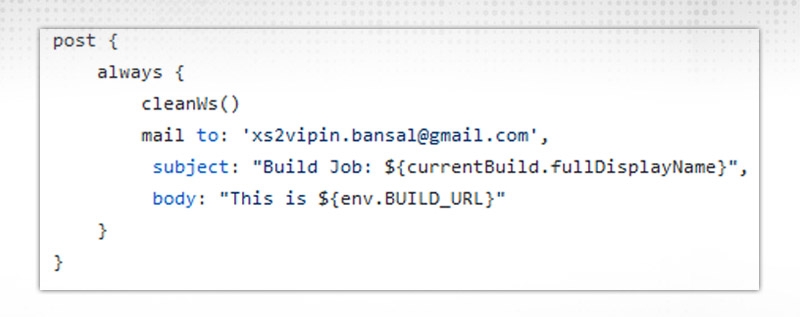
Jenkinsfile

In this post section, we used “always” block which will be executed every time irrespective of build result:

  • cleanWs() -- clean up the workspace to save system space
  • mail -- will drop a mail. It includes various arguments to pass:
  • to - Receiver’s Email Address
  • subject - Subject of Mail
  • body -- contents of the mail.

So, when your changes got committed and Jenkins build job executed, it will clean up the workspace and send mail to a respective receiver in the end:
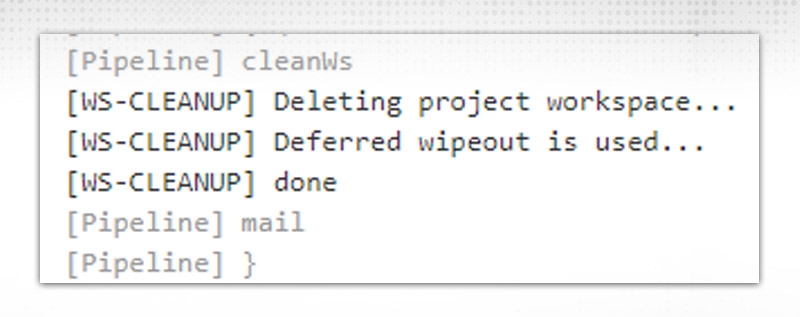
Jenkinsfile

  • Different Email notifications can be created by using the Extended EMail plugin also. E.g.

email text body: 'Contents ', recipient providers: [culprits(), developers()], subject: 'Build Job'

  • body -- contents of the mail
  • recipient provides -- Different options available for this. E.g.
  • Culprits -- One who is responsible for the failure of the build
  • Developers -- One who committed code in GitHub repository from the last build till current build

These details, Jenkins build jobs will capture from GITHUB commit IDs.

  • subject -- Subject of MAIL

- Similarly, for slack notifications, we have to install the SLACK plugin, configure in Jenkins configure the system and then use it in Jenkins file like below:

post {
    success {
        slackened channel: '#team-org',
                  color: 'good',
                  message: "The pipeline ${currentBuild.fullDisplayName} completed successfully."
    }
}

Cloning Git Repository

  • One option which we are using for checking out repositories is the “Checkout” option. For a multibranch pipeline, source code can be checked out by using simple

node {

checkout scm }

in Jenkinsfile. For some complex behaviour, like if we want to check out some feature branch or we want to do some cleaning after checkout, then normal “checkout” will not work for us. We have to create complex “checkout” options to make this possible.

Suppose, we want to capture this scenario:
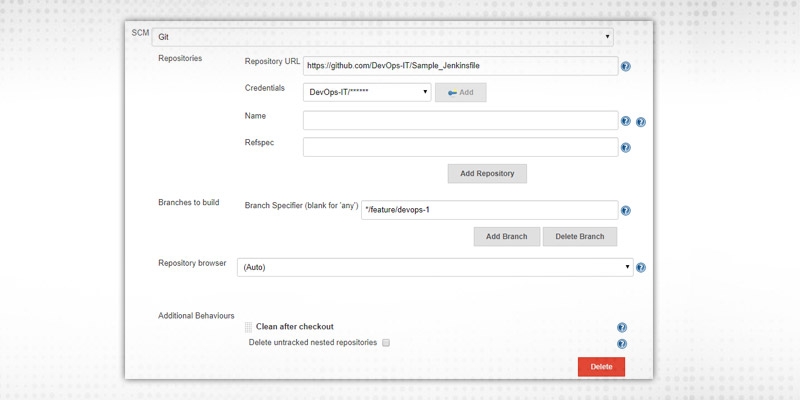
Cloning git repository1

Equivalent checkout statement will be:

checkout([$class: 'GitSCM', branches: [[name: '*/feature/devops-1']], doGenerate Submodule Configurations: false, extensions: [[$class: 'CleanCheckout']], submoduleCfg: [], userRemoteConfigs: [[credentialsId: 'a096c812-1543-4328-b3e0-33cc5117045d', url: 'https://github.com/DevOps-IT/Sample_Jenkinsfile']]])

It will checkout feature branches only and we provide a “CleanCheckout” class object to extend its functionality.

Conclusion

Just to summarise, in this blog, we have gone through Jenkins build job example and set up a multibranch pipeline job so that every developer working in their respective branch can test his code if it is breaking or will break after merging or not. We set up a webhook for “push” events, similarly, it can be set up for the creation of pull requests or after when merge will happen to master. It will be effective for any issues during the development phase only. Notifications can be set up to point out the issues and the person responsible for that issue, the notification will notify everyone in real-time instead of waiting for the job to complete.

In the next blog, we will discuss test cases and test scenarios as testing is also a major part of any software process or lifecycle. Unit testing can be easily integrated with Jenkins and is very effective in generating and sharing test reports. So, see you all in the next blog with test cases. Keep continuing your efforts in setting up a multibranch pipeline job and share your feedback.

fbicons FaceBook twitterTwitter lingedinLinkedIn pinterest Pinterest emailEmail

     Logo

    Vipin Bansal

    As an experienced DevOps professional, I am having a good understanding of Change and Configuration Management as well. I like to meet new technical challenges and finding effective solutions to meet the needs of the project. I believe in Sharing is Learning.


Comments

Trending Courses

Cyber Security Course

Cyber Security

  • Introduction to cybersecurity
  • Cryptography and Secure Communication 
  • Cloud Computing Architectural Framework
  • Security Architectures and Models
Cyber Security Course

Upcoming Class

7 days 25 Jan 2025

QA Course

QA

  • Introduction and Software Testing
  • Software Test Life Cycle
  • Automation Testing and API Testing
  • Selenium framework development using Testing
QA Course

Upcoming Class

-0 day 18 Jan 2025

Salesforce Course

Salesforce

  • Salesforce Configuration Introduction
  • Security & Automation Process
  • Sales & Service Cloud
  • Apex Programming, SOQL & SOSL
Salesforce Course

Upcoming Class

7 days 25 Jan 2025

Business Analyst Course

Business Analyst

  • BA & Stakeholders Overview
  • BPMN, Requirement Elicitation
  • BA Tools & Design Documents
  • Enterprise Analysis, Agile & Scrum
Business Analyst Course

Upcoming Class

7 days 25 Jan 2025

MS SQL Server Course

MS SQL Server

  • Introduction & Database Query
  • Programming, Indexes & System Functions
  • SSIS Package Development Procedures
  • SSRS Report Design
MS SQL Server Course

Upcoming Class

7 days 25 Jan 2025

Data Science Course

Data Science

  • Data Science Introduction
  • Hadoop and Spark Overview
  • Python & Intro to R Programming
  • Machine Learning
Data Science Course

Upcoming Class

7 days 25 Jan 2025

DevOps Course

DevOps

  • Intro to DevOps
  • GIT and Maven
  • Jenkins & Ansible
  • Docker and Cloud Computing
DevOps Course

Upcoming Class

6 days 24 Jan 2025

Hadoop Course

Hadoop

  • Architecture, HDFS & MapReduce
  • Unix Shell & Apache Pig Installation
  • HIVE Installation & User-Defined Functions
  • SQOOP & Hbase Installation
Hadoop Course

Upcoming Class

-0 day 18 Jan 2025

Python Course

Python

  • Features of Python
  • Python Editors and IDEs
  • Data types and Variables
  • Python File Operation
Python Course

Upcoming Class

14 days 01 Feb 2025

Artificial Intelligence Course

Artificial Intelligence

  • Components of AI
  • Categories of Machine Learning
  • Recurrent Neural Networks
  • Recurrent Neural Networks
Artificial Intelligence Course

Upcoming Class

7 days 25 Jan 2025

Machine Learning Course

Machine Learning

  • Introduction to Machine Learning & Python
  • Machine Learning: Supervised Learning
  • Machine Learning: Unsupervised Learning
Machine Learning Course

Upcoming Class

20 days 07 Feb 2025

 Tableau Course

Tableau

  • Introduction to Tableau Desktop
  • Data Transformation Methods
  • Configuring tableau server
  • Integration with R & Hadoop
 Tableau Course

Upcoming Class

-0 day 18 Jan 2025

Search Posts

Reset

Receive Latest Materials and Offers on DevOps Course

Interviews